In this article, we will look at the step-by-step launch of advertising using Facebook Ads manager. To do this, we need: a facebook account, a proxy, an antidetect browser, a cesspool, a card for paying for advertising, and some kind of CPA service.
1. Facebook account can be purchased on the website https://fbstore.ru/ Here you will find a wide variety of bay accounts to suit your needs. Use coupon when paying Kansk_Abrosimov – 15% discounts. There is also a coupon: FBCPAPRO (purchase and renewal) for antidetect browser Indigo with 50% discount.
2. Proxies can be bought on the Proxy-store website at this link
3. Antidetect browser can be recommended or indigo, или Dolphin{anty}. Discount – 20% for payment by promo code: FBCPAPRO for any tariff. Click on Dolphin Anti register and apply the coupon. In the latter, up to 10 profiles can be registered for free.
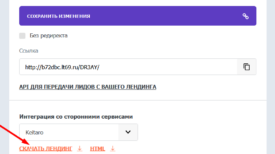
4. If you are going to pour a tote or something white, then you may not need a cloaca, but you will only need Hosting If you fill in the inside, then you will definitely need a cloaca. The best solution for these needs is a tracker Keitoro . Discount – 20% for the first purchase of any license for up to 3 months. Promo code: FBCPAPRO. Click on Keitaro, register and apply the coupon.
5. Take payment here https://flexcard.cards/ In my opinion, a good service with good support, the card costs from 2 to 4$ depending on the bin, replenishment via USDT.
6. To select creatives, you will need a CPA service. How to work with them, it was Here и Here.
7. After you have purchased an account, you need to create a profile in the antidetect browser. For example, we use Dolphin{anty} We pass the registration and open the browser interface. First you need to create a proxy. We take the data from the proxy and enter it as shown in the screenshot.


Next, we create a profile. We take the data purchased in Fbstore account and enter them as shown in the screenshot.


You have a new profile. We press START and enter the account through the login, password (you can enter by cookies, having previously entered them when creating the profile).


After we logged into the account, without doing anything in it, we leave and give it a rest for 12-24 hours. After the time has passed, we go back and start creating ads. Click ADS manager and create a campaign.

For an advertising campaign, for example, we take Offer ProstaAktiv from Italy geo. Next, in the Republic of Kazakhstan, click “Go to the Account Overview section.” We confirm the FP and add the card. To continue, you need to press “Next” everywhere.


In the tab that opens, set the goal of our campaign – this is “Leads”. Then, in the next tab, turn on the budget and set the amount of the campaign’s daily budget.


Next, in the ad group tab, set the location of the conversion event – Site. We create a pixel, we do everything as in the screenshot.


We reload the page and we have a pixel ID. Copy the pixel code, where instead of asterisks will be your pixel ID and paste this code on the “Thank you” page of your Offer right after the head tag

Then select the Lead event. In the location, add the geo of the gulf of Italy. We remove all other geos.


Adding targeting and placement. In our case, we pour on a wide feed on Facebook and Instagram.

Next, we create an ad. Choose a FP, upload a creative and a description, insert a link. We take the link from your hosting or from keitaro. How to work with keitaro, description Here. Next, click the “Publish” button


Your ad campaign is being reviewed. After a positive decision, you start to pour in a plus.
As always, I wish everyone to find a converting link, good bays and
high appraisal!
If you have any questions write below.